We first stumbled across KiCad when looking to modify PCB components before sending the boards in for manufacturing. We learned that to modify the PCB, we had to modify the Gerber files, and to do that, you should use KiCad. This was a bit of a snag in our plan as none of use knew how to use KiCad, or even more simply, what exactly a Gerber file was. So, I immediately set out to try and find a solution for our problems and ended up learning a new CAD program in the process.
A Side Note: Basically, Gerber files are the electronic world’s version of a PDF. They tell manufacturers everything they need to know about the PCB.
Learning KiCad was a slow process. The software has had MANY updates, so every tutorial I found was using a program that looked different than mine. This meant that I had to constantly stop and try to figure out what I actually had to do. Of course, I finally figured it all out, and managed to find some very good tutorials. Below are my favourites.
- “KiCad Basics, Part 1: Schematic Capture”- 15 min. Youtube video by Node 7. https://www.youtube.com/watch?v=YoyO8OqKqVk&t=1s
- “KiCad Basics, Part 2: PCB Design”- 15 min. Youtube video by Node 7. https://www.youtube.com/watch?v=l6eyhptlev8
- “KiCad Basics, Part 3: Gerber Export and OSHPARK Ordering”- 8 min. Youtube video by Node 7. https://www.youtube.com/watch?v=PlYtGGD5mZ4
- FREE Udemy KiCad Course- https://www.udemy.com/learn-kicad-printed-circuit-board-design/learn/v4/overview
The Udemy course took me a lot longer than expected because of troubleshooting. Many of the parts the instructor was using had been moved or removed, and thus, I had to learn how to compensate just to follow along with the tutorials! One of the biggest problems was a push button switch that was used in the 1st lesson. Others in the class also couldn’t find the component, but the instructor never answered our questions. Here’s my solution: download the KiCad bonus libraries and add it as an active library to your project, or go to Github and download the extra switches library, then activate the library in KiCad- an alternate is in there! Regardless, the course and Youtube tutorials were still very helpful. Here’s the most important things I learned:
- Hotkeys- shortcut keys that are a lot easier than trying to remember what button is which (there are a lot of buttons). All shortcuts work by hovering over the part and then pressing the desired key.
| KEY | WHAT IT DOES |
| R | Rotate a part |
| M | Move a part |
| E | Edit a part’s characteristics |
| B | Switches from front screen to back (to prevent overlap) |
| W | Add wires |
| Q | Place no connect flags |
| C | Copy a part |
| ? | Shows all possible hotkeys! |
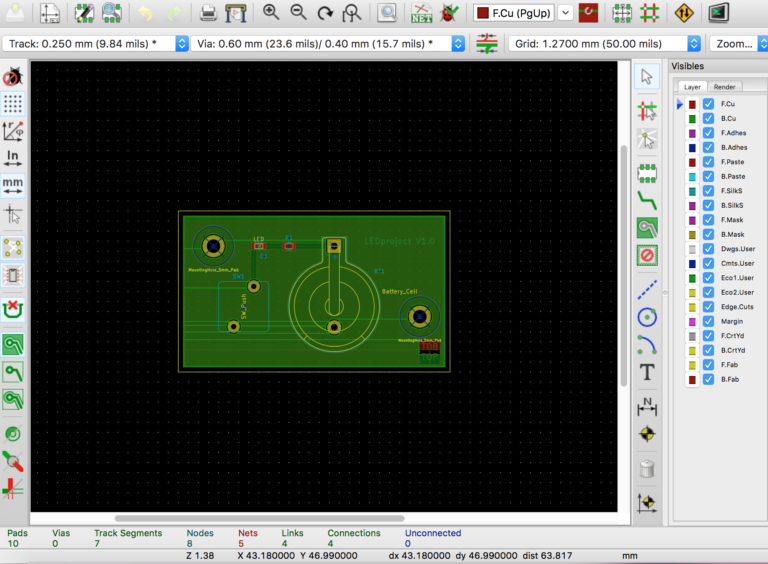
- Basic steps to create something in KiCad:
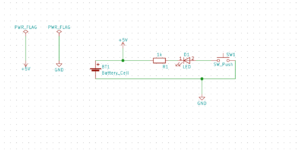
1.Use Eeschema to draw out all the components in a blueprint.
2.Use PCBnew to connect components and turn your blueprint into a functioning PCB.

3.Use the plot function to create your Gerber files (should include: t.cu, b.cu, t.solder, b.solder, t.silkscreen, b.silkscreen, drill file, edge cuts, read me files).
4.Once you have your Gerber files plotted, put them into a zip file and then you can upload them to your PCB manufacturer of choice! Here is the manufacturer we went with: http://dirtypcbs.com/store/pcbs